A front handspring is one of the easiest front flips you can do in parkour. It has minimal movements and can be learned easily with simple skills and practice. Since it is a basic move, you can learn it easily through this guide with a little help from others. Of course, you need the guts and the courage to execute it.
Step One: Do A Stretching Or Warm-Up

In any simple and advanced moves in parkour, always start with a warm-up and stretching. The front handspring puts force on the legs, arms, and back; therefore, you should prioritize exercises focusing on these body parts.
Warm-up and stretching also rev up the body’s cardiovascular system helping reduce the risk of injury and lessen muscle fatigue. As you warm-up, body core temperature increases, enhancing your essential reflexes in parkour.
The routines include cross-arm stretch, hamstring, and side and shoulder stretch. You can also do arches for back flexibility but ensure that you begin with gentle exercises to increase core muscle temperature, then proceed to dynamic stretches.
Also, do not forget to wear comfortable clothing to move effortlessly without dealing with torn pants or shirts. Wear comfortable shoes too since you will need to protect your feet.
At the same time, choose your practice area carefully because it will be essential in learning the front handspring easily.
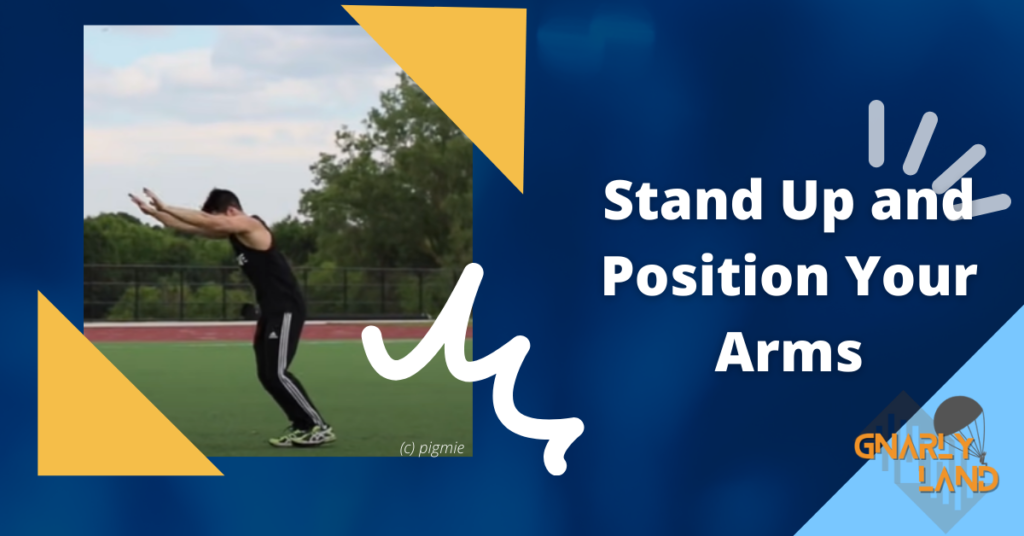
Step Two: Stand Up and Position Your Arms
Once you have stretched out well and done the warm-up, it is time to get in position.
The starting position in a front handspring is standing upright with your legs together, toes pointing forwards.
The arm position is crucial in a front handspring since most force will act on your arms. Begin by positioning your arms in front of you.
You can also start with your arms on your side and pull them up as you slightly run a few steps to gain momentum for the handstand position. Find out what works best for you.
The handspring will put your arms and hands fully in action since it will change position as you drive from a handstand down to landing.
Coordinate your arms to follow the direction of your body because it will give you the power to do the front handspring.
Step Three: Kick Up Into A Handstand

When you already have the gist of working around with your arms to make a handstand, it is now time to kick up and stand with your hand.
Start by running a few steps, lift your arms upon your head, close to your ears, then drive it down the ground. Your legs should also move simultaneously, with your arms inverting you to the ground.
Use one leg to kick up and one to support you. After doing so, your head will be a few inches above the ground, and your hands planted firmly on the spot.
It would be best to have good shoulder flexibility and upper body strength in a handstand, so get those parts trained as much as possible.
If you are not yet a master of handstands, you can try practicing handstands against a wall. Go back to the wall not further than a foot, and then put your hands down on the ground.
Use one leg to kick and one leg to jump. Focus your strength on your shoulders and touch the wall with the sole of your feet. Keep doing this until you can do a handstand without the wall.
One mistake in this step is not bringing your legs together in your handstand. Parkour does not require your moves to be as perfect as in gymnastics, but it will help you execute moves in the safest and fastest way possible if you take note of gymnasts’ body movements when they train.
Always bring your legs together when doing a handstand. If you fail to do so and leave another leg behind, you might land unevenly on the ground, making it harder to get a good landing position.
To make it simple, use one leg to drive you up into a handstand, but once you are inverted in the ground, you should position both feet together.
Step Four: Push Off the Ground With Your Arms
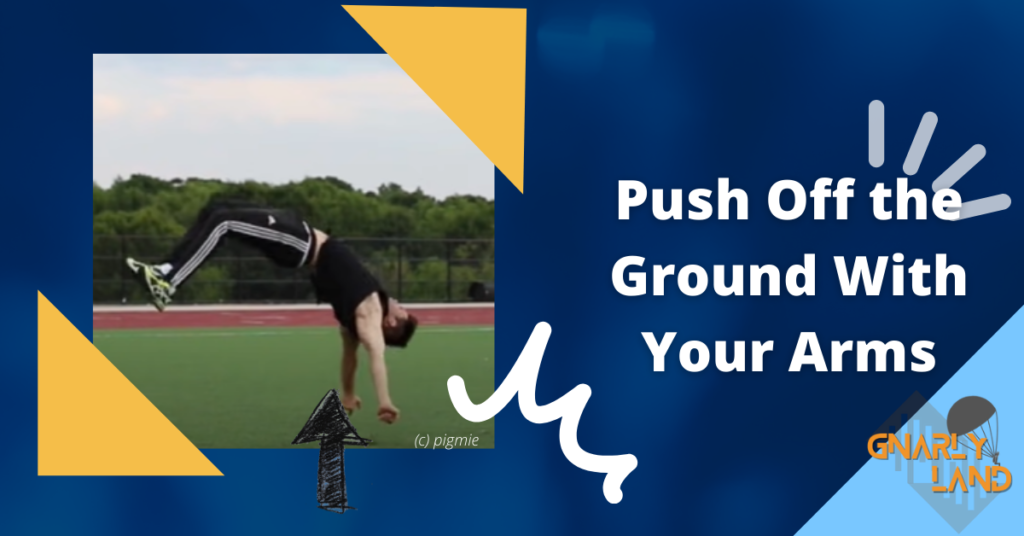
Perform a handstand in a bigger space without a wall. Add a little force from your shoulder like a popping motion and bring your chest up, putting your entire body forward.
During this time, ensure that your hands are flat on the ground and be ready to use your hands to push off from the ground like a spring. Arch your back as far as possible while you do this.
A kip-up is where you transition from a prone position to standing on your feet. You can slightly extend your feet forward while in a handstand to maneuver your body position. Knowing how to do kip-up may be helpful in this step.
Plan as you push yourself from the ground, focus, and do not let go if you are unsure of the next step. It is essential to have the presence of mind in this step because your momentum is not stopping as you rotate.
Step Five: Land on Your Feet and Slightly Lean Back

Be ready to push yourself off the ground and drive your body forward. Spot beforehand a landing area where you can comfortably land on your feet.
Make sure that you land on both feet and lean back to avoid falling on your back. You will know that you are making the step correctly if you squat.
The squat position or leaning back figure is essential to dissipate the force when you land and ensure that you can stand upright and balance your body.
It will be quite challenging on the first try, but as you practice more the front handspring, you will get the distance and momentum right for your body.
A popular mistake some beginners make is leaving one hand on the ground when landing. You can do this during practice, but if you attempt to do the full front handspring, you should ditch this step.
Your hands should be in front of you as you squat or lean back. At the same time, you can also do a one-hand handstand, but it would be best to use both hands to ensure that you get enough force to support your body as you push the ground.
Step Six: Execute and Polish Your Front Handspring
Once you have familiarized the steps, it is time to attempt your first front handspring. Polish it up and enjoy your newly learned trick.
You can also explore parkour moves where you can incorporate a front handspring. Again, it will certainly be challenging, making it worth learning. Practicing it regularly will help you master it.
When you do a front handspring, never start with a lazy force or without enough power. If you do this, you will not have the superior force to turn over and perform the handspring; hence you may trip or land on your back.
A tip that can help you get good momentum for the front handspring is to run a few steps giving you the needed speed.
Step Seven: Practice Your Front Handspring Regularly
If you are a beginner, it would be best to practice your front handsprings regularly. The more you practice, the more you can perfect your move.
Practicing also will get you used to this new trick improving your foot, body, and arm movements. You can also find a parkour community nearby to help you practice or give tips on improving it.
Remember to train in a safe environment like a gym prepped with rubber mats or as simple as the beach or an open field is good, especially if a beginner.
I know it is tempting to perform a trick that is easy to do and learn, such as the front handspring but never train without putting safety first.
If an injury happens when practicing a front handspring, check and assess your wound’s condition first. If you think it is deep or a major abrasion, it is time to check it before training again.
Safety should always go first because you will never perform any new move again if you break your bones. Remember to always practice a new move with utmost caution.
When you master it, you can try exploring other variations of a front handspring like a double front flip which you can learn to do in this article.
Another way to maintain the knowledge and skill in performing a front handspring is to teach it to others. They can be friends, budding parkour athletes, or co-athletes.
By teaching this move, you will be able to practice it regularly, perfecting the skill and pointing out the aspects that need improvement.
Frequently Asked Questions About A Front Handspring
Now that you know how do a front handspring, you might have questions that need answers. Here are some of those you might find helpful.
Question: Can anyone do a front handspring?
Answer: This move is not just for parkour, freerunners, or trickers. Anyone can do this as long as you put effort and learn it. This tutorial has no complicated steps, and you can certainly follow them.
Try it if you think you have what it takes to do a front handspring. As they say, “you will never know unless you try.”
Question: How long will it take to perform a front handspring?
Answer: This depends upon your progression. Each person is different, and there are other factors to consider, like your body build and time spent training.
It will take around two to four months for beginners like yourself to master the routine, but you can shorten this if you work hard. So, do your best and see where it will lead you.
Question: Is a front handspring easier than a back handspring?
Answer: This depends on your courage and confidence. A back handspring may be scarier in most cases since imagining yourself falling is daunting.
Also, a front handspring may be harder to do since a proper front handspring requires shoulder and upper flexibility that most people may lack.
Question: What do I need to master the front handspring?
Answer: If you plan to master the front handspring, you better prepare. Work on upper body strength, balance, controlled body coordination, and focus. These are the skills you need.
On top of it, be ready for minor or major injuries and get someone who can help you, like a coach. If you want to know why you might need a parkour coach, you can read an article I have written at this link.
Question: Where Should I practice a front handspring?
Answer: It is best to practice in a safe, training-conducive area like a gym, a beach, or an open field. Ensure there are fewer people and the ground is not hard like a concrete block.
Since a front handspring involves flips, it is unavoidable to fall during practice, and training in a safe environment will lessen the dangers you put yourself into.
You can also practice in your home; it is up to you to be creative in your training area.
Question: Is a front handspring important in parkour?
Answer: A front handspring is the easiest move in parkour and freerunning. Knowing to do a handspring is your first move to harder tricks or movements in parkour.
Question: Will I be able to learn other tricks faster?
Answer: You can do many variations like the one-handed front handspring, 180 front handsprings, tucked front handspring, and many more, as long as you know the proper front handspring as indicated in this tutorial. The skills and coordination you can get in doing a front handspring will prepare you for more complex parkour stunts.
Conclusion
Front handsprings may be simple, but it takes effort and practice to master them. So be ready and apply this tutorial to show off your front handspring like a pro. Remember, nothing comes easy, it will be hard at first, but it will be satisfying to learn it yourself.