While most mountain bikes are made to withstand constant wear and tear and usage in rough terrain, there are trails that will expose your bike to more rigorous tracks and impacts. Some trails require you to jump your bike over rocks and other obstacles. Knowing the different trail types will help you assess your skills and readiness before you head out and choose the best mountain bike to bring so you can fully enjoy while staying safe.
What are five of the most common mountain bike trails? Technical, pump track, jump, slabs, and flow are five of the widely used trail types in MTB riding. Each trail varies in difficulty and some require more skills than the others.
In this article, you will have a better understanding of five of the most common mountain bike trails, get tips on how to ride and have fun in each trail, know their degree of difficulty, and get recommendations on which type of mountain bike is best suitable for every trail.
Technical

A technical trail is very subjective. The best and simplest definition I can share with you is that if the trail requires you to have specific riding skills instead of just fitness, it is a technical trail.
This means that my definition of a technical trail most likely varies from yours. A technical trail has obstacles which requires you to keep on practicing until you are able to tackle them. These obstacles can be big rocks, roots, logs, or steep climbs.
If you find a technical trail, continue to practice until you master the correct position, vision, speed, and braking. In some trail obstacles (like rocks), you have to stand so you can react to bumps by shifting your weight.
Choosing the right line to set your vision into is also important. It helps you set a firm trajectory in your mind and maintain focus on the exit. Continuous practice will also help you identify the right speed to navigate through obstacles. It can be fun and challenging to charge through rocks and bounce off, but sometimes the straight and clean are the quickest route.
Lastly, know when to brake. It may not be a good idea to hit the brakes when you are in the we rocks/roots area.
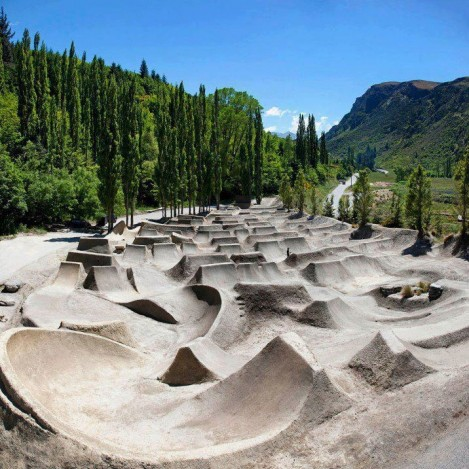
Pump Track

Pump tracks are a series of rollers, berms, and other trail features that make riders “pump” their bikes to create momentum and continue riding smoothly. There are indoor and outdoor pump tracks. Usually, the humps in pump tracks are comparatively smaller than ones for jump trails.
Originally, these trails are for BMX riders where they can practice control and the use of body weight to create a smoother, faster ride. These trails are continuous in nature and create a flowy loop allowing you to ride it from any point of the trail.
Before riding in a pump track, you need to first check the condition of your bike. Prioritize inspecting the bearings of both your front and rear wheelset. You need to have a smooth running mountain bike to fully enjoy a pump track.
When approaching rollers, you need to keep your head high to properly see where you’re going. Remove weight from the front of your bike upon touching the front of the roller. You can do this by pulling your arms near your body. When you reach the top of the roller, push your arms down to transfer weight to the front end of your bike to increase the speed of your bike. This motion of “pumping” your bike is where pump tracks get their name. By pumping you continue your ride without having to pedal.
Berms are also a part of pump tracks. To clear a berm, you need to have the right combination of speed, braking, positioning, and balance. Upon entering a berm you need to slow down and choose a line on the outer part of the turn. When you’re already inside, it is advised not to apply brakes as it will cause your rear end to stop and takes your bike off balance. Speed up when you’re about to finish the berm to continue the ride.
Pump tracks are relatively easy and are fun to ride. Beginners can definitely ride pump tracks as long as they already mastered the fundamentals of riding. Pros often use pump tracks to practice and stay fit.
Jump
Jump trails, also known as dirt jump trails are some of the most exciting trails a mountain biker can ride. It is composed of solid, compressed soil in the form of a huge ramp so riders can jump with their bikes. This trail type is where you can do a proper “sending”.
When you arrive at a jump trail, you need to do a proper track read first. Familiarize yourself with the track and choose lines and landing spots. As you approach a ramp, make sure that you commit to the jump. Hesitation most of the time will lead to short jumps and cause accidents.
Pull your bike up like you would in a bunnyhop to get maximum lift and clear a jump. When you are already up in the air, you can do tricks to make your flight more exciting. But make sure that you grab your handlebar firmly upon landing. Use your arms by bending them to help absorb the impact.
Jump trails are more suitable for advanced riders who have already mastered the proper body positioning and have more experience in the trails. Most of the time, beginners get scared and hesitate before they jump. If you’re a beginner and want to ride a jump track, you need to practice on smaller jumps first. A good practice would be to do bunny hops over tree stumps and other obstacles not taller than two feet.
Slabs

Image source: Granite slabs in Teanaway Community Forest, Washington
Slabs are massive lumps of rock where you can roll down, jump into, jump out of. And once you get to know and learn how to ride them they can be heaps of fun. Confidence and control are the two biggest factors when riding on slab trails. Take control by learning how to modulate the brakes and distributing your weight to the proper places. You’d be surprised to see it’s actually possible to stop midway on a steep slab.
One very important thing to do before you start your ride is to judge the conditions of the rock. They can be slippery when wet and you don’t want to skid down out of control.
Another factor to consider is correct body position. When you’re riding slabs, one of the most important things to do is to always look ahead. Avoid looking down so you can safely exit the trail. If you are on the way down a rock slab, it is essential to keep your weight backwards in these big rock rolls. If you’re too over the front, you’ll most likely flip over the handlebars.
Next thing to learn is the right line choice. Look for a line where you can hit the brake and slow down. As much as possible, this line won’t require you to hop, change a feature, or change direction. Look ahead and try to see whether you have a safe exit. Think about how you’re going to control your speed towards that exit. If you are going down, look at what’s after the rock roll and choose the smoothest line.
And lastly, when finally turning to the next section, come in a little bit slower. Get your braking done nice and early and remember not to hit the brake while turning. If you do this, the back end might slide out, you’re not going to have grip, and might end up spinning around or toppling off the bike.
Flow
Speed and rhythm are highlighted in a flow trail. It features jumps, rollers, and berms that maximizes momentum to reduce the need for pedaling and braking. Smoothness is its main trait. There is no need to maneuver through big rocks or roots. Which means, many beginner riders can start their MTB adventure here. Flow trails also highlight fitness over equipment. Beginner MTBs will do, which makes this trail even more novice-friendly.
Some long-time riders argue that flow trails are boring and take away the fun and excitement mountain biking has to offer. That is not necessarily the case. Most flow trails have several sharp and tight twists. And it actually gets more difficult the more you ride faster. Braking is an essential skill in this trail.
Also, riders have to start from somewhere. I think the flow trail will help the MTB community to grow even more. This is a good trail for beginners to harness their skills in speed and braking, which are very essential as they take on more difficult trails in the future.
Conclusion
Different trails require different skills. Start with the trail you are most comfortable with and keep on practicing. As you feel more confident, explore other trails and expand your skills. Feel free to use the tips above to help you get started. Remember to have fun and stay safe!